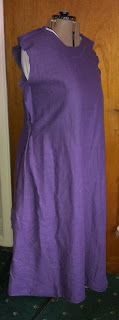
 Unfortunately my garb making has not been going as well
as I'd hope this month. I had originally hoped to have my underdress done by the
garb workshop this coming weekend (not a hope), and be able to work on the apron
dress there. But as you can tell from the picture, weellll.... I'm a fair bit off from
finished.
To make my Norse under dress, I'm using
the information from this previous shared link,
specifically the couple of paragraphs on the Hedeby/Haithabu finds. This page shows a possible layout for a Hedeby style underdress based on finds. I've come across
various cutting diagrams for Norse style underdresses in my searches, but I find it very hard to believe that
a dress where every square inch of fabric had to have spun and woven,
would have been cut with large waste pieces. So to
this end I've been making this up so far
by using a rectangle system of fabric cutting to use the fabric as efficiently
as possible.
If you'll forgive my dodgy paint skills, I've made up a basic, if wonky diagram of how I cut out my pieces.
- The front and back pieces are half the width of my hips, plus seam allowance, and the length is the full width of the fabric, so it may be a little short when worn.
- The width of the fabric halved is longer then my arm length, so I cut a strip of fabric which is measured at my bicep, plus seam allowance, to become my sleeves.
- Lastly, I folded the remaining fabric in half, and cut out my gores, measured from my wasit to the hem of the dress, so I'd get the maximum width possible for bottom hem. Gore pieces 1 and 2 will be the side goes, while gore pieces 3, 4a and 4b will be shortened slightly, and become the front and back gores. Gore 4 will have a central seam to join the two pieces, and because of this will be place in the back.
This is the diagram of the fabric as adapted for the width and amount I had, and my own body shape, but it really is worth measuring and adapting these kinds of layouts to your own shape in order to get the best of your fabric usage. This isn't necessarily the most period method of construction, especially as modern fabrics are generally a lot wider then pre-industrial ones, but it's efficient. This has left me with a small amount of leftover linen that is destined to become a hat trimmed with white rabbit fur - in keeping with the colour scheme.
 Ah yes, the colour scheme. While I've been endeavouring to
ensure the correct shape for my garments, my fabric selections are a little less
realistic. Partly due to the fabric being what I had available, and partly due
to the required Shenanigans colour scheme, I have a purple linen for the
underdress, where an undyed linen was more likely in period, allowing for the
few samples that seem to contain traces of blue or brown dyes. And for apron
dress, I have a thick cream fluffy fabric, which a burn test concludes is mostly
cotton, but which could conceivably fool the man on the galloping horse into
thinking it's a wool from a distance.
No comments:
Post a Comment